- Published on
A simple gRPC prototype with Go and NextJS
Introduction and Motivation
As I approach a decade of solving problems with Python, I find myself eager to explore the world of compiled programming languages. Yes, I've had to endure some JavaScript and TypeScript - even during the creation of this blog, though I consider those more a necessary evil than a personal decision.
My plan is to take a small step down from the peaks of Python's high-level elegance into (what appears to be) the simple, yet performant nature of Golang.
As someone who has self-learned all of what I know, I dare yet not dive into the depths of C, Zig, and Rust. We will get there, but we must walk before we run.
So back to what I know, what better way to learn a new language than with a prototype - an MVP?
Here's what I'm thinking:
- A frontend in NextJS to display dynamic data.
- A backend in Go to fulfill my business logic.
- gRPC with protobuf to link them together.
Simple enough, yet complex enough to learn some Go and a few extra bits of tech along the journey.
In this code-along blog you'll create a simple, yet scalable web application architecture.
Table of Contents
But why not just REST?
REST is the communications method I am most familiar with. However, for no better reason than to stress myself out while learning something new, I've chosen to fulfill backend calls with gRPC.
If you're unfamiliar with the technology, I cover it below.
But first, a primer on Application Programming Interfaces (APIs).
A Primer on APIs
For the uninitiated, APIs themselves enable communication across systems and services. A set of rules and protocols that, together, facilitate the interaction between systems.
A simple analogy: A bartender at a bar is a real-world metaphor for an API.
You may or may not know what goes into a Cucumber Mojito, but you sure can ask a bartender for one. Sure enough, the bartender receives the request, does some work, and returns with the Mojito, ready for you to enjoy.
In this metaphor, the bartender is the API.
You don't need to know the details of how the drink is made; you just need to know how to ask a bartender for the drink.
In computers, REST and RPC (amongst other technologies) are sets of rules and principles that guide the design and creation of these APIs.
REST
Representational State Transfer (REST)
If you've heard of GET, POST, PUT, PATCH, DELETE methods, you're probably already familiar with REST - an architectural style for designing networked applications.
While REST is not a standard, websites using RESTful APIs are said to be following RESTful principles. This is because REST is a set of guidelines rather than a strict standard.
However, here's a simple example of how a simple REST implementation works:
Say you're on a library website which is using REST calls to deliver data to the site. You land on the homepage, are presented with a multitude of book covers which are available to rent, and you want to get details on a book on the homepage.
You click on any book title, and:
- The site will send a GET request using REST to ask its backend servers for details on that book. ISBN, Author, Title, etc.
- The GET request is received by the server, which processes it and responds with the requested data.
- At that point, since REST is stateless, each request is independent, and any further interactions will require new requests to be made.
To summarize, data is requested, a service responds, and all this happens over easy-to-read text, JSON most likely.
That seems basic enough if the action when you click that button is to return only that specific information.
Say instead of clicking on that book brings you to a new page. That page contains the previous information, but also details on the author, their other works, similar books from that same genre, etc.
A developer following the principle of separation-of-concerns will likely build distinct API endpoints to handle different features or data, so each new feature, such as author details or related books, may require a separate API request.
This is where REST can become cumbersome, even inefficient, as it requires multiple requests to fulfill all the data needed to display a single page.
RPC

From the Wikipedia article on RPC:
In distributed computing, a remote procedure call (RPC) is when a computer program causes a procedure (subroutine) to execute in a different address space (commonly on another computer on a shared computer network), which is written as if it were a normal (local) procedure call, without the programmer explicitly writing the details for the remote interaction.
In a much simpler explanation, RPC is a protocol that allows a program to call functions or procedures on a different machine, abstracting the network details.
In a practical sense, say you have a client that needs to retrieve data from a database. This could be a simple web application that has a button for a user to retrieve pictures of cats.
We would write a function that queries the database and returns the data to the client.
We write the business logic in a function on a different machine, and the client would call that function as if it were local, and the pictures of cats would be returned.
We still need to write the function on the service side, but the client doesn't need to know the details of how the function is executed or how the data is retrieved. It just needs to know the function name, its location, and the data it expects, and the types of inputs and outputs.
It's almost like magic to the client.
An Example with Code
Real basic-like, working work RPC looks like:
Client (The caller):
# rpc_client.py

# Define RPC
server = rpc_library.channel("loadbalancer.pizza.com:8888")
order = server.place_order(size="Large", toppings=["cheese", "pepperoni"])
print(order)
Server (Fulfills the caller):
# rpc_service.py

def __start_oven(temp: int) -> bool:
    """Internal function to backend"""
    print(f'Oven set to {temp} degrees!')
    return true

def place_order(size: str, toppings: list[str])
    """Place order into other building/fulfillment services local to this codespace."""
    __start_oven(temp: 400)
    ...
    return f'Order placed for a {size} pizza with {toppings=}!'
For all intents and purposes, the client is just calling an internal function. It thinks server.place_order is local to its code space. The server is doing all the heavy lifting, and the client is none the wiser.
gRPC
From the gRPC website:
gRPC is a modern open source high performance Remote Procedure Call (RPC) framework that can run in any environment. It can efficiently connect services in and across data centers with pluggable support for load balancing, tracing, health checking and authentication. It is also applicable in last mile of distributed computing to connect devices, mobile applications and browsers to backend services.
"g" Remote Procedure Call (gRPC) is a communications framework for building interfaces between different services, and one of many adaptations of RPC. So like RPC, it allows you to call methods on a remote server as if they were local function calls.
Some key differences, and advantages over standard RPC are:
- Use of Protocol Buffers (protobuf) instead of text-based formats like JSON
- Code auto-generation
- HTTP/2
Also similar to RPC, a popular use case for gRPC is communications between distributed systems and micro/services architectures.
I won't dive into all the benefit of gRPC over RPC - however a solid place to start is Google's own blog.
Protobuf
Not a framework, library, standard, or protocol - Protocol buffers (protobuf) is a versatile, language agnostic, data serialization format.
The format is flexible, extensible, and used for data transmission across systems and programming languages.
Working together with gRPC, protobuf is used to define the structure of the data (the messages), while gRPC uses it to define the service methods to be used across systems.
With protobuf, a schema is defined using .proto files which are used to generate code from those definitions (using support libraries).
When used with gRPC, protobuf is used in lieu of text-based formats like JSON or XML. Protobuf is most often serialized into binary data, but if needed, it can also be serialized into text-based formats like JSON.
Above all, it's the combination of gRPC and protobuf that makes them a compelling alternative to REST services.
Alternatives
Another popular choice for cross-service communication is GraphQL. But why not GraphQL?
Compared to REST and gRPC, GraphQL has a significantly steeper learning curve and is more complex to implement.
GraphQL's flexible query language can be a double-edged sword. While it offers a high-level customization, GraphQL requires careful management to prevent end-users from taking advantage of its endpoints.
For this project, I'm looking for a simple, scalable, and efficient solution - GraphQL kind of over-complicates that.
Enough theory for now, let's get on with it.
Tools and Setup
So let's build a simple prototype to get started with gRPC.
We want a basic website, with a button to call some data and display it on the page. That button will trigger a gRPC call that is fulfilled by Go by retrieving data from some database.
We're end up with something like this:
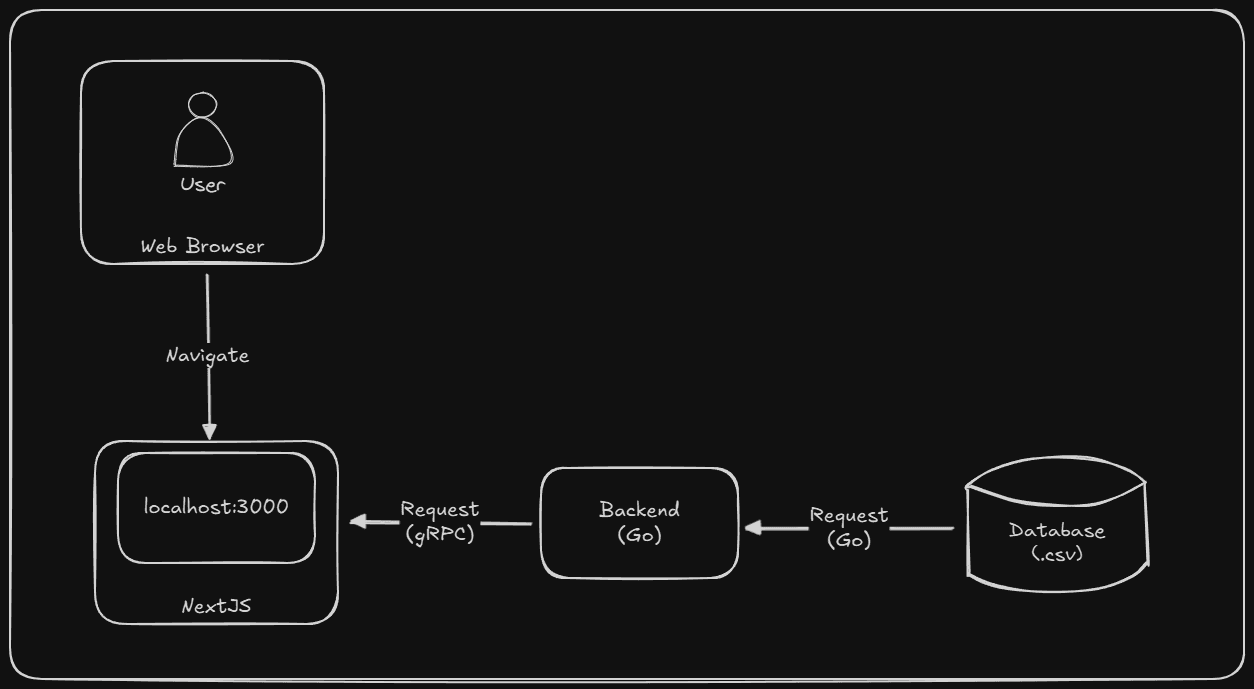
At a high level we will:
- Create a NextJS frontend
- Create a Go backend
- Create a gRPC contract
- Generate Go and JavaScript code from the contract
- Implement the gRPC client in NextJS
- Implement the gRPC server in Go
- Serve data from the backend to the frontend via gRPC.
For simplicity's sake, a .csv file will take the place of our database, which we'll display on the website - though we'll at least implement a strategy pattern to make our code at least extensible.
Project Layout
Our starting folder hierarchy looks like:
grpc_next_go_starter/
└── grpc_library/
    ├── backend/
    ├── frontend/
    └── proto/
You can build it with this command:
mkdir -p grpc_next_go_starter/grpc_library/{backend,frontend,proto}
Some notes on these folders:
- The root level folder
grpc_next_go_starter/will contain all the code for this example, and what we will refer to as the project root. grpc_library/is the name of our application and will contain the frontend, backend, and proto folders.backend/will contain the Go code for the gRPC server.frontend/contains NextJS code for the web application.proto/stores the gRPC contract that will be used by both the frontend and backend.
As you read through this article, we'll fill in each folder, create new files, and install necessary dependencies.
Installation
Steps
- Install all core software components
- Runtimes:
go,node - Frameworks:
nextjs,grpc - Install supporting software components:
- Runtime support libraries:
protoc,grpc-js,proto-loader - Configure our protobuf definitions
- Configure the frontend
- Configure the backend
- Run and Test
Unless specifically mentioned, commands will work for both platforms. However, I'll include installation methods for both a Linux (Debian - though I'll reference as debian/linux) machine as well as macOS computer when commands need to diverge.
- For Linux I'll use the
aptpackage manager. - For macOS I'll run through the installations with (homebrew)[https://brew.sh/].
Core Runtimes
We'll need to first install the core software runtimes, NodeJS and Golang, to our system.
Both NodeJS and Go are cross-platform, so the installation process should be similar on both macOS and Linux. They also both have package managers, npm and go get, respectively, which we will use to install dependencies.
Lastly, they each have large communities and extensive documentation, so you should be able to find help quite easily if you run into any issues. Altogether, they are a good choice for this type of project.
NodeJS
NodeJS is a JavaScript runtime.
Node.js® is a free, open-source, cross-platform JavaScript runtime environment that lets developers create servers, web apps, command line tools and scripts.
Node itself changes quite a bit so we are going to be installing the Node Version Manager, nvm, to manage node versions.
Run the following command in a terminal.
curl -o- https://raw.githubusercontent.com/nvm-sh/nvm/v0.40.1/install.sh | bash
Now install the latest LTS version:
nvm install --lts=Jod
Here I chose the Jod release (v22.13.1, minor version at the time of writing), however you can list available LTS releases with nvm ls-remote --lts
This will install a couple things. Node itself, as well as the Node Package Manager, npm which we will use to install dependencies.
We can verify with
node --version
npm --version
Go
Go is a statically typed, compiled programming language which emphasizes simplicity, efficiency, and reliability.
In our project, Go will be responsible for business logic fulfillment, the gRPC server, and talking to supporting services like databases and our filesystem.
Run the following commands in a terminal to install Go:
# macOS
brew install golang

# debian/linux
apt update && apt install golang-go
Next, navigate to the backend/ folder. We'll run a command to give us a starting point for this backend.
go mod init grpc_library_backend
This will create a single file in our backend/ directory titled go.mod
Add Go Package Binaries to Path
When a system attempts to run a binary from the terminal by name, it will look through all folders specified in its $PATH variable. You can see what that variable holds by running echo $PATH on a terminal.
There's a chance the Go installation did not set its binary folder in your PATH variable.
To check and add it if necessary, run the following script in your terminal:
GOPATH=$(go env GOPATH)

# Check if GOPATH is in PATH
if [[ ":$PATH:" != *":$GOPATH/bin:"* ]]; then
  echo "GOPATH not found in PATH. Adding it to .bashrc."

  # Check if GOPATH is already defined in .bashrc
  if ! grep -q 'export GOPATH' ~/.bashrc; then
    echo 'export GOPATH=$(go env GOPATH)' >> ~/.bashrc
  fi

  echo 'export PATH=$PATH:$GOPATH/bin' >> ~/.bashrc
  source ~/.bashrc

  echo "GOPATH added to PATH and .bashrc sourced."
else
  echo "GOPATH is already in PATH."
fi
Essential Frameworks
Our key frameworks for this project are NextJS and gRPC.
NextJS
We are going to use NextJS, a React-based web framework, to run our frontend.
I like NextJS for its simplicity and ease of deployment, but any other React-based web framework could be used here instead.
In reality, you could use any frontend framework you like, or even just vanilla JavaScript, but for the sake of this article, we'll stick with NextJS.
We'll start with a bare-bones installation using a NextJS example template.
To install, navigate to the frontend/ directory and run:
npx create-next-app . --example hello-world
This command will install a minimal NextJS website - a single page that renders the message "Hello, World".
If you're curious to see what the page looks like, you can run the command:
npm run dev
And navigate to localhost:3000 to view in your browser.
Pretty sweet, we have a basic webpage. You can kill the process with Ctrl+C at the terminal.
Checking the project's root directory again and you'll see that you have a few extra files in your frontend/ folder.
The folder structure might look something like this:
grpc_next_go_starter/
└── grpc_library/
    ├── backend
    │   └── go.mod
    ├── frontend
    │   ├── README.md
    │   ├── app
    │   │   ├── layout.tsx
    │   │   └── page.tsx
    │   ├── next-env.d.ts
    │   ├── next.config.ts
    │   ├── package-lock.json
    │   ├── package.json
    │   └── tsconfig.json
    └── proto
gRPC Libraries
gRPC permeates both the client and server side of the API, so we'll need to install the necessary libraries for both.
We'll start with the frontend.
Frontend Libraries
We'll install the gRPC client for NodeJS and a utility for loading .proto files.
If you're still in the frontend/ folder, great. If not, navigate to the frontend/ directory and run:
npm install --save-dev @grpc/grpc-js @grpc/proto-loader
Notes on this command:
- The
--save-devflag tellsnpmto install the packages as development dependencies, which means they will not be included inpackage.jsonautomatically. @grpc/grpc-jsis the gRPC client for NodeJS.@grpc/proto-loaderis a utility for loading.protofiles.
Next, navigate up a level and into the backend/ directory.
Backend Libraries
In the backend/ directory, if you haven't already initialized the directory for go (you'll find a go.mod file if so) run the command:
go mod init grpc_library_backend
If you have, you can proceed with the following commands:
go get google.golang.org/grpc
go get google.golang.org/protobuf/proto
go install google.golang.org/protobuf/cmd/protoc-gen-go@latest
go install google.golang.org/grpc/cmd/protoc-gen-go-grpc@latest
We're installing a few packages here:
- grpc - the gRPC library for Go
- protobuf/proto - the protobuf library for Go
- protoc-gen-go - the Go protocol buffer compiler plugin
- protoc-gen-go-grpc - the Go gRPC plugin for the protocol buffer compiler
Go doesn't need any additional libraries to load .proto files, as the protoc-gen-go and protoc-gen-go-grpc plugins will generate the necessary code for us.
This will automatically create a go.sum file which contains an exact version of the package installed (including dependencies), as well as a checksum of that package. Simultaneously, the commands will populate the existing go.mod file with packages required for this backend service.
Lastly, verify the installation of our system level packages with:
protoc-gen-go --version
protoc-gen-go-grpc --version
Protobuf Compiler
We'll also need to install the protobuf compiler, protoc, to generate the necessary code for our gRPC service.
Run the following commands in your terminal:
# macOS
brew install protobuf

# debian/linux
apt install protobuf-compiler -y
Remember to use sudo if you're not running as root (you most likely won't be running as root).
To verify the installation, run:
protoc --version
OK, so that's our core software and key runtimes installed.
We're now ready to configure our frameworks, create .proto definitions, and generate our gRPC code.
Configuration
NextJS App
Navigate to the frontend/ directory. Here, we will build out our front-end.
As the point is to have a mechanism to pull data from a backed, we'll want a button, but also a way to display the data.
We'll first start with updating the homepage.
Update the homepage
The homepage is the first page a user will see when they visit the site. In this example, we'll have a very basic, minimal homepage that will display a button, that when pressed, will show a list of book metadata.
Step 1: update the tsconfig.json file to include the following lines in the compilerOptions key:
  "baseUrl": ".",
  "paths": {"@/*": ["*"]},
On my end, that file ends up looking like:
{
  "compilerOptions": {
    "baseUrl": ".",
    "paths": { "@/*": ["*"] },
    ...
  }
}
Step 2 Delete the file: app/page.js
Step 3 Create a new file page.tsx, in a new app/(site) folder.
So if in the frontend/ directory, you could do this:
mkdir "app/(site)"
touch "app/(site)/page.tsx"
And add the following code:
// app/(site)/page.tsx

import GetBooks from '@/components/Books'

const HomePage = () => {
  return (
    <div style={{ maxWidth: '1200px', margin: '0 auto', padding: '20px' }}>
      <h1 style={{ fontSize: '32px', fontWeight: 'bold', marginBottom: '20px' }}>
        Home - My Books
      </h1>
      <GetBooks />
    </div>
  )
}

export default HomePage
Step 4 Create a new file, data/books.json:
This step will be temporary, but will set us up for later use.
Essentially, what we're doing is going to test the frontend logic to ensure we can at least retrieve data locally, before we unleash gRPC.
If in the frontend/ directory, you could do this:
mkdir -p "public/data"
touch "public/data/books.json"
Populate the file with this data:
[
  {
    "name": "Dune",
    "author": "Frank Herbert",
    "format": "Hardcover",
    "year": 1965,
    "isbn": "9780441013593",
    "description": "A science fiction novel about a desert planet and its political intrigue.",
    "genre": "Science Fiction"
  },
  {
    "name": "1984",
    "author": "George Orwell",
    "format": "Paperback",
    "year": 1949,
    "isbn": "9780451524935",
    "description": "A dystopian novel exploring the dangers of totalitarianism.",
    "genre": "Dystopian"
  },
  {
    "name": "The Hobbit",
    "author": "J.R.R. Tolkien",
    "format": "Hardcover",
    "year": 1937,
    "isbn": "9780547928227",
    "description": "A fantasy novel about a hobbit's journey to reclaim treasure from a dragon.",
    "genre": "Fantasy"
  },
  {
    "name": "Ender's Game",
    "author": "Orson Scott Card",
    "format": "E-book",
    "year": 1985,
    "isbn": "9780812550702",
    "description": "A young boy is trained to become a commander in the fight against an alien race.",
    "genre": "Science Fiction"
  }
]
Step 5 Create the Books component.
We will use a Next.js Client Component to fetch the data from the books.json file and display it on the page.
WHile we can stick everything in a single file, I think it's easier if we split it up into multiple.
Step 5.1 A new file, components/FetchButton.tsx
This file will create a button that upon press will fetch books.
In the frontend/ directory, create a new file:
mkdir "components"
touch "components/FetchButton.tsx"
And populate it with this data:
// components/FetchButton.tsx

'use client';

interface ButtonProps {
  onClick: () => void;
  loading: boolean;
}

const Button = ({ onClick, loading }: ButtonProps) => (
  <button
    onClick={onClick}
    style={{
      padding: '10px 20px',
      backgroundColor: '#4CAF50',
      color: 'white',
      border: 'none',
      borderRadius: '5px',
      cursor: 'pointer',
      marginBottom: '20px',
      transition: 'background-color 0.3s',
    }}
    disabled={loading}
  >
    {loading ? 'Retrieving Books...' : 'Fetch Books'}
  </button>
);

export default Button;
Step 5.2 A new file, components/BookTable.tsx
This file contains the code for the creation of a Table which will display the books data.
In the frontend/ directory, you could do this:
mkdir "components"
touch "components/BookTable.tsx"
And populate it with this data:
// components/BookTable.tsx

'use client';

interface Book {
  [key: string]: string;
}

interface BookTableProps {
  books: Book[];
}

const BookTable = ({ books }: BookTableProps) => {
  const tableStyle = {
    width: '100%',
    borderCollapse: 'collapse' as 'collapse',
    border: '1px solid lightgray',
  };

  const tableHeaderStyle = {
    backgroundColor: '#f1f1f1',
    padding: '10px',
    textAlign: 'left' as 'left',
    border: '1px solid lightgray',
  };

  const tableRowStyle = {
    borderTop: '1px solid lightgray',
    transition: 'background-color 0.3s',
  };

  const tableRowHoverStyle = {
    backgroundColor: '#f9f9f9',
  };

  const cellStyle = {
    padding: '10px',
    border: '1px solid lightgray',
  };

  const headers = books.length > 0 ? Object.keys(books[0]) : [];

  return (
    <div style={{ overflowX: 'auto' }}>
      <table style={tableStyle}>
        <thead>
          <tr>
            {headers.map((header, index) => (
              <th key={index} style={tableHeaderStyle}>
                {header.charAt(0).toUpperCase() + header.slice(1)}
              </th>
            ))}
          </tr>
        </thead>
        <tbody>
          {books.map((book, index) => (
            <tr key={index} style={{ ...tableRowStyle, ...(index % 2 === 0 ? tableRowHoverStyle : {}) }}>
              {headers.map((header, idx) => (
                <td key={idx} style={cellStyle}>
                  {book[header]}
                </td>
              ))}
            </tr>
          ))}
        </tbody>
      </table>
    </div>
  );
};

export default BookTable;
There's a bit in here, but most of it is styling for the table.
Step 5.3 A new file, components/Books.tsx
We need a file to pull it all together. This file will hold logic to render a button, fetch data, and eventually display on the page.
In the frontend/ directory, create a new file:
mkdir "components"
touch "components/Books.tsx"
And populate it with this data:
'use client';

import Button from './FetchButton';
import BookTable from './BookTable';
import useFetchBooks from '../hooks/useFetchBooks';

const GetBooks = () => {
  const { books, loading, error, fetchBooks } = useFetchBooks();

  return (
    <div style={{ backgroundColor: 'white', padding: '20px', borderRadius: '8px', boxShadow: '0 4px 8px rgba(0, 0, 0, 0.1)' }}>
      <Button onClick={fetchBooks} loading={loading} />

      {loading && <p style={{ color: 'gray' }}>Loading books...</p>}

      {error && <p style={{ color: 'red' }}>Error: {error}</p>}

      {books.length > 0 ? (
        <BookTable books={books} />
      ) : (
        !loading && <p style={{ color: 'gray' }}>No books available.</p>
      )}
    </div>
  );
};

export default GetBooks;
Step 5.4 A new file, hooks/useFetchBooks.tsx
Finally, we want to decouple the data fetching mechanism from the display logic.
In the frontend/ directory, create a new file:
mkdir "hooks"
touch "hooks/useFetchBooks.tsx"
And populate it with this data:
import { useState } from 'react'

interface Book {
  [key: string]: string
}

const useFetchBooks = () => {
  const [books, setBooks] = useState<Book[]>([])
  const [loading, setLoading] = useState<boolean>(false)
  const [error, setError] = useState<string | null>(null)

  const fetchBooks = async () => {
    setLoading(true)
    setError(null) // Reset any previous error
    try {
      const response = await fetch('/data/books.json')
      if (!response.ok) {
        throw new Error('Failed to fetch books')
      }
      const data = await response.json()
      setBooks(data) // Set the fetched data into the state
    } catch (error: any) {
      setError('Error fetching books')
    } finally {
      setLoading(false)
    }
  }

  return { books, loading, error, fetchBooks }
}

export default useFetchBooks
Step 5 Recap
That's a lot of files, but a lot of it is styling. Separating the files makes it easier to manage and maintain, but requires repeating a few things.
Overall, it just looks more daunting than it really is.
We're setting up a button to fetch books and displaying them in a table.
Using the useState hook, we're setting up a state for books, loading, and error messages. When the button is clicked, we set the loading state to true, reset any previous errors, and try to fetch the books from the hooks file we created.
If the fetch is successful, we set the books state to the static data we've defined. There's even a loading... message while the data is being fetched.
If there's an error, we set the error state to the error message.
After all that, we render the books in a table.
Basic Frontend Recap To recap, we now have a folder structure that looks like:
grpc_library
├── backend
│   ├── go.mod
│   └── go.sum
├── frontend
│   ├── README.md
│   ├── app
│   │   ├── (site)
│   │   │   └── page.tsx
│   │   └── layout.tsx
│   ├── components
│   │   ├── BookTable.tsx
│   │   ├── Books.tsx
│   │   └── Button.tsx
│   ├── hooks
│   │   └── useFetchBooks.ts
│   ├── next-env.d.ts
│   ├── next.config.ts
│   ├── package-lock.json
│   ├── package.json
│   ├── public
│   │   └── data
│   │       └── books.json
│   └── tsconfig.json
└── proto
You can run this again with npm run dev and navigate to localhost:3000 to see the changes.
You'll see a more styled UI now, with a button to fetch books and display them in a table.
But we are not done yet. All the book data is being pulled by NextJS itself. We need to set up the backend to fulfill the request for books.
We'll need setup a separate backend for that.
gRPC and Protobuf
gRPC along with protobuf give us flexibility to split this growing system into smaller services which we can maintain individually.
We have the frontend doing frontend client component stuff, and the backend looking to jump into the mix.
We'll make calls to a backend service and that service will feed us data.
What makes that possible is protobuf and we'll start by creating a simple contract to serve as the foundation of our communication.
Contracts and .proto files
At the project root, the grpc_library folder, we'll have a proto/ folder we have yet to touch.
We will create the gRPC contract here, and will reference the definition of our API with supporting tools we've already installed to generate our Go and JavaScript code.
Create a file in this folder named books_service.proto and fill it with the following:
syntax = "proto3";

option go_package = "backend/pb"

package books;

// The Book message contains the book information
message Book {
    string name = 1;
    string author = 2;
    string format = 3;
    int32 year = 4;
    string isbn = 5;
    string description = 6;
    string genre = 7;
}

// Request and Response messages for Books
message BooksRequest {}

message BooksResponse {
    repeated Book books = 1;
}

// The BooksService provides the GetBooks function
service BooksService {
    rpc GetBooks (BooksRequest) returns (BooksResponse);
}
The magic of protobuf lies in that we can define the structure of our data in a .proto file and then use that file to generate code for both the frontend and backend.
In this file, we define a Book message that contains the information for a single book, kind of like a prototype. This defines the structure of the book data we expect to communicate to ond fro.
The message BooksRequest {} and message BooksResponse {} lines are used to define the request and response messages for the GetBooks function.
Lastly, a lot happens in the service BooksService {} block. This is where we define the service methods that will be used by the client to interact with the server. In this case, we have a single method, GetBooks, which takes a BooksRequest and returns a BooksResponse.
This altogether defines the contract for our gRPC service, and the protoc compiler will use this file to generate the necessary code for both the frontend and backend.
Generate Go and JavaScript code
Now let's generate the appropriate Go and JavaScript files.
Go Code
In the proto/ directory run the following command::
protoc --go_out=.. --go-grpc_out=.. books_service.proto
This will create a new folder structure within the backend/ folder:
├── backend
│   ├── go.mod
│   ├── go.sum
│   └── pb
│       ├── books_service_grpc.pb.go
│       └── books_service.pb.go
...
JavaScript Code
In the root directory, frontend/, run the following command:
npx proto-loader-gen-types --longs=String --enums=String --defaults --oneofs --grpcLib=@grpc/grpc-js --outDir=pb ../proto/*.proto
Go Backend
Moving into the my_library/backend/ directory, we'll see only a couple files: go.mod and go.sum. Those are the files we created when we initialized the backend directory.
We'll need to create a few more files to get the backend up and running. Create a new file main.go
// main.go
package main

import (
    "context"
    "encoding/json"
    "log"
    "net"
    "os"

    pb "grpc_library_backend/pb"
    "google.golang.org/grpc"
)

const (
    port     = ":8080"
    dataFile = "data/book_library.json"
)

type server struct {
    pb.UnimplementedBooksServiceServer
}

// GetBooks handles the request to fetch books
func (s *server) GetBooks(ctx context.Context, req *pb.BooksRequest) (*pb.BooksResponse, error) {
    log.Println("Received GetBooks request") // Log when a request is received

    // Open the JSON file
    file, err := os.Open(dataFile)
    if err != nil {
        log.Printf("Failed to open data file: %v", err) // Log if there's an error opening the file
        return nil, err
    }
    defer file.Close()

    // Decode the JSON data into a slice of books
    var books []pb.Book
    decoder := json.NewDecoder(file)
    if err := decoder.Decode(&books); err != nil {
        log.Printf("Failed to decode JSON data: %v", err) // Log if there's an error decoding the JSON data
        return nil, err
    }

    // Convert to a slice of pointers to pb.Book
    bookPointers := make([]*pb.Book, len(books))
    for i := range books {
        bookPointers[i] = &books[i]
    }

    log.Printf("Successfully retrieved %d books", len(books)) // Log the number of books retrieved

    log.Println("Successfully processed GetBooks request") // Log when processing is successful

    // Return the response
    return &pb.BooksResponse{Books: bookPointers}, nil
}

func main() {
    // Listen on the specified port
    lis, err := net.Listen("tcp", port)
    if err != nil {
        log.Fatalf("Failed to listen: %v", err)
    }

    // Create a new gRPC server
    s := grpc.NewServer()

    // Register the BooksService with the gRPC server
    pb.RegisterBooksServiceServer(s, &server{})

    // Log and start the server
    log.Printf("Server is running on port %s", port)
    if err := s.Serve(lis); err != nil {
        log.Fatalf("Failed to serve: %v", err)
    }
}
This file is kind of it. The main.go file is the entry point for our Go application.
We define a server struct that implements the BooksServiceServer interface. This struct has a single method, GetBooks, which reads a JSON file and returns the book data.
The main function sets up the gRPC server, registers the BooksService with the server, and starts the server on port 8080.
We also define a dataFile constant that points to the location of the JSON file containing the book data.
Data Loading
Ideally you'd want to connect this Go server to a live database. However, this article is getting a little long.
Instead, we want a JSON file that holds the data, similar to what we have in our temporary frontend, except this is going to be "permanent".
Create a folder in the backend/ folder called data and copy over the file that's in our frontend/public/data/books.json
If you're currently in the 'backend/' folder, you can run this:
cp -r ../frontend/public/data/ .
That will copy over the data folder from the frontend/ folder and bring it into the backend/ folder for go to serve. We should now have a folder structure that looks like:
├── backend
│   ├── data
│   │   └── books.json
│   ├── go.mod
│   ├── go.sum
│   ├── main.go
│   └── pb
│       ├── books_service_grpc.pb.go
│       └── books_service.pb.go
...
Frontend Updates to Handle gRPC Calls
Frontend API Handler
API routes are handled by the Route Handler system for NextJS. We will have a single API route, /api/books that will be used to return our query back to the browser requesting the data.
In the frontend/ directory, create a new folder app/api/books and a new file route.js:
mkdir -p app/api/books
touch app/api/books/route.js
Edit the route.js file to look like:
// api/books/route.js
import { NextResponse } from 'next/server'
import { join } from 'path'

const grpc = require('@grpc/grpc-js')
const protoLoader = require('@grpc/proto-loader')
const PROTO_PATH = join(process.cwd(), '../proto/books_service.proto')

const packageDefinition = protoLoader.loadSync(PROTO_PATH, {
  keepCase: true,
  longs: String,
  enums: String,
  defaults: true,
  oneofs: true,
})

const proto = grpc.loadPackageDefinition(packageDefinition).books
const client = new proto.BooksService('localhost:8080', grpc.credentials.createInsecure())

const fetchData = async () => {
  return new Promise((resolve, reject) => {
    client.GetBooks({}, (err, response) => {
      if (err) {
        reject(err)
      } else {
        resolve(response)
      }
    })
  })
}

export async function GET(req) {
  try {
    const data = await fetchData()
    const books = data.books

    console.log('Books data received from gRPC server:', books) // Log the books data

    return NextResponse.json({ books }) // Return only the books data
  } catch (err) {
    console.error('Error fetching data from gRPC server:', err) // Log the error
    return new NextResponse(JSON.stringify({ error: err.message }), {
      status: 500,
      headers: { 'Content-Type': 'application/json' },
    })
  }
}
We'll also log when books are received.
Run with the API Route
Lastly, we want to call the API route when clicking the "Get Books" button.
Because we compartmentalized that functionality within its own file, a hook, we just need to update that file to call the API route.
We will update one line,
const response = await fetch('/data/books.json') // Update to fetch from your API route
to look like:
const response = await fetch('/api/books') // Update to fetch from your API route
So we tell it to no longer fetch from a local file, rather use the API we just created.
Finally, open a new terminal window (we need to run two at a time here) and run:
npm run dev
You can verify the frontend is trying to fetch from the backend as you'll see something like this in the terminal after clicking the "Fetch Books" button.
 ✓ Compiled /api/books in 194ms
 ⨯ [RangeError: Invalid status code: 0] {
  code: 'ERR_HTTP_INVALID_STATUS_CODE'
}
 ⨯ [RangeError: Invalid status code: 0] {
  code: 'ERR_HTTP_INVALID_STATUS_CODE'
}
 GET /api/books 500 in 280ms
To resolve, start the backend.
In the backend\ folder, run:
go run main.go
Navigate to localhost:3000 and click the "Fetch Books" button to view the data!
That's it, we're done!
The ending folder structure is going to look something like this:
grpc_library
├── backend
│   ├── data
│   │   └── book_library.json
│   ├── go.mod
│   ├── go.sum
│   ├── main.go
│   └── pb
│       ├── books_service.pb.go
│       └── books_service_grpc.pb.go
├── frontend
│   ├── README.md
│   ├── app
│   │   ├── (site)
│   │   │   └── page.tsx
│   │   ├── api
│   │   │   └── books
│   │   │       └── route.js
│   │   └── layout.tsx
│   ├── components
│   │   ├── BookTable.tsx
│   │   ├── Books.tsx
│   │   └── Button.tsx
│   ├── hooks
│   │   └── useFetchBooks.ts
│   ├── next-env.d.ts
│   ├── next.config.ts
│   ├── package-lock.json
│   ├── package.json
│   ├── pb
│   │   ├── books
│   │   │   ├── Book.ts
│   │   │   ├── BooksRequest.ts
│   │   │   ├── BooksResponse.ts
│   │   │   └── BooksService.ts
│   │   └── books_service.ts
│   ├── public
│   │   └── data
│   │       └── books.json
│   └── tsconfig.json
└── proto
    └── books_service.proto
Conclusion
If you've followed along, you should now have a working NextJS frontend that can query a Go backend using gRPC.
This is a REALLY simple example, but it should give you a good starting point to create bigger and better protobuf contracts.